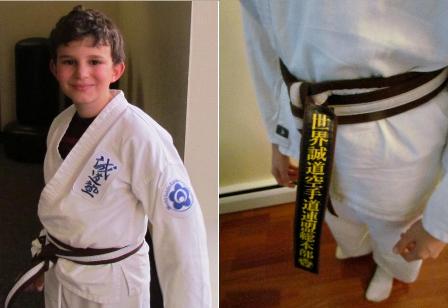
Seido Patches (pictured on the left)
Gi Top with the patches properly placed
For the Seido patches: Both the circle and the rectangular patches get sewn on the left side of the gi top. The circle patch should be placed below the left arm seam, with the plum blossom circle centered on the shoulder seam. The rectangular patch goes on the left, front, chest area for you (or your child) … the patch should have the line at the bottom and should NOT be lined up with the seam of the jacket, but should be “readable” when the top is tied onto your child.
Advanced Stripe (pictured on the right)
Junior brown belt with a properly placed advanced stripe
The advanced stripe for the belts should get sewn on as follows…
For juniors (those children with a white stripe in their belt): the black stripe should be positioned on the side with the white stripe running through the belt, with the circle symbol at the bottom of either end of the belt (doesn’t matter which end of the belt the advanced patch is sewn on).
For adults: follow the same directions, eliminating the “white stripe of the belt” directions. If you have doubts and would like to safety pin the stripe onto the belt and then get approval from one of the adult black belts that would be fine. This patch is NOT “iron on.” Must be sewn on or, I have heard that folks use Liquid Stitch (my experience has been that the belt becomes too stiff with that method).
Get fit and don’t quit! Parents of students get a FREE MONTH of training!
For more information or to register, call Kyoshi Karen at 410-499-2476 or email at pamfiliskarate@gmail.com

